SHOTS
Shots will reveal certain amounts of information. Framing, focus and movement can add deeper meaning to your shots. While a lot can be fixed in post-production, you are doing yourself a huge service if you get everything to work in camera. Things like white balance can be fixed in post production, but nothing is quite like having the files being what you are looking for in camera. This requires a lot of planning & intention and understanding of your digital tools.
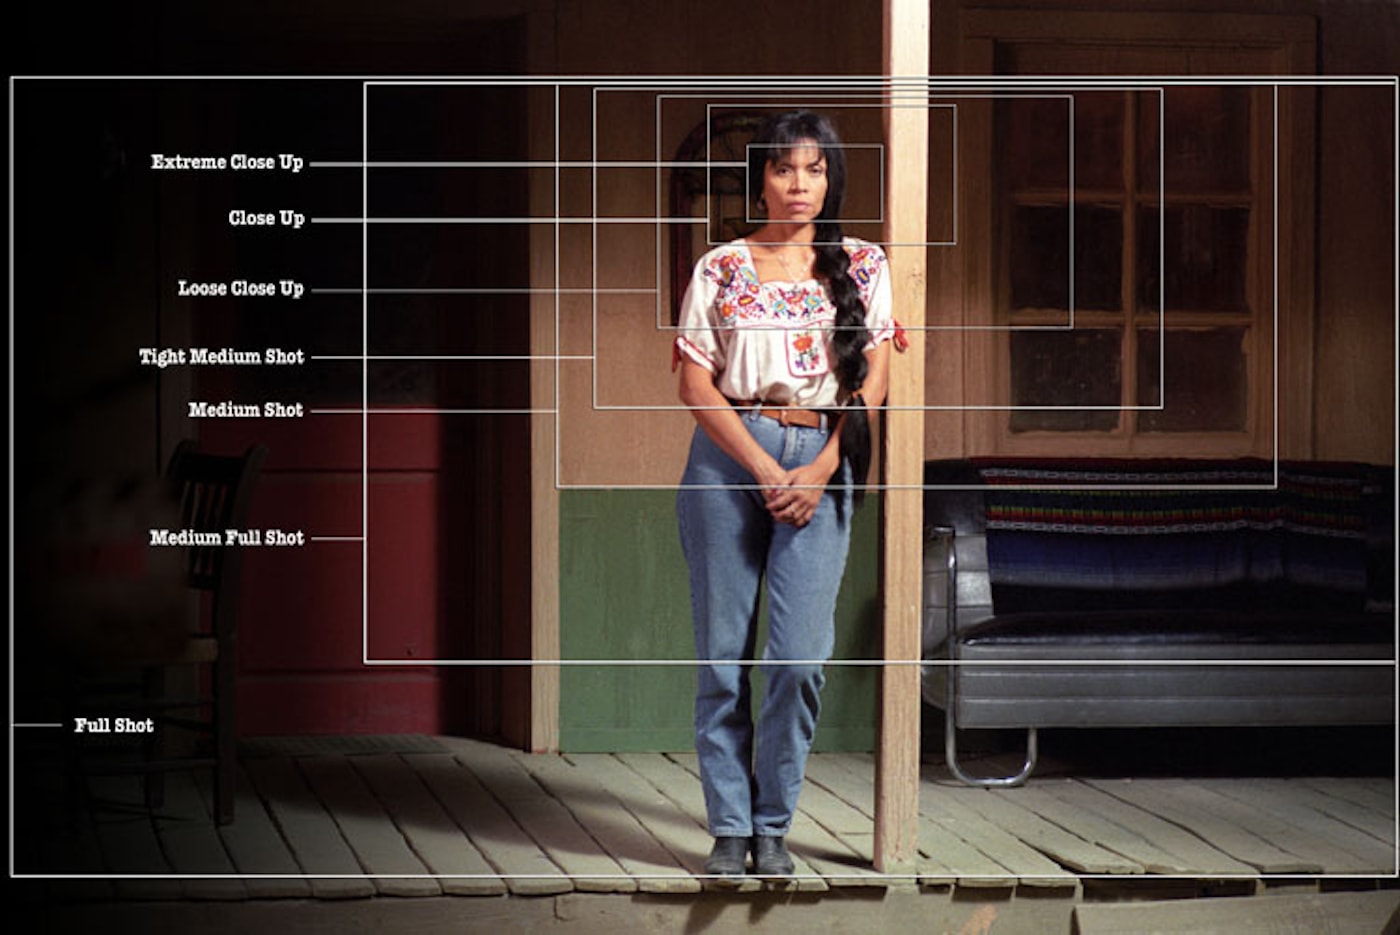
Types of shots
extreme close up – extreme circumstance calls for an extreme close shot. Example, black swan when we learn that feathers are growing out of the characters back
close ups – allows for detail, expression. Use this shot when you want to reveal a subject’s emotions and reactions
medium shot – roughly the waist up. The emphasis is more of your subject, but keeps the surroundings visible
full shot (wide shot) – lets your subject fill the frame, but there is also an emphasis on scenery. In a full shot, the camera is usually close enough to capture your subject’s basic appearance.
long shot – establishes a scene, place and time
establishing shot – a shot at the start of a scene that clearly shows us the location of the action. Can be paired with an aerial shot and is used to show where everything will happen.
aerial shot – overhead view, gives the viewer a sense of the whole scene
high angle shot – looks down on a subject to make them feel inferior, an extreme long shot uses their surroundings to do the same.
EDITING
Types of cuts
jump cuts – a sudden often jarring cut from one shot or scene to another without intervening devices (such as fade-outs). The first example of this happened by accident, someone was recording a bus and the film in their camera got jammed. When they got the film unstuck, the bus had driven away and was now a buggy. On film, it looked like a bus magically turned into a buggy. If planned & executed well, it feels like magic but you need a tripod to do it well
L cut – when you have a clip of audio that is playing without a paired visual, but then the visual comes in later
fade in/fade out – an optical effect in which a shot appears gradually out of darkness and then gradually disappear fade in/out in AfterEffects
temporal overlaps – where a shot shows the same action twice, for example an interior shot of a man climbing out of a window, cut to an exterior shot, but the man repeats the action of climbing out the window. Can look clunky to the eye, but sometimes can be used to show emphasis or create an alternate sense of time
stop motion animation – captured one frame at time, with physical objects that are moved between frames. When you play back the sequence of images rapidly, it creates the illusion of movement. example of student reel How to import a series of photos http://joshuamosley.com/tutorials/AEimportSequence/
replacement animation – example is a form of stop motion. But instead of making one puppet that you put through its phases, you make pre-sculpted elements that you swap in and out.
zooming – be sure to do on camera
Production tips
Don’t be afraid to get rid of your favorite shots – sometimes you have a shot you really love & want to include but they simply don’t serve the piece. It is really important to let go of certain shots that you are in to if they aren’t working with the rest of the piece
Videos are more interesting with a variety of lengths of clips, but establish a rhythm with the way that they are arranged. Imagine composing a dance or a piece of music. You are looking to find a natural flow, establishing that flow & build on it
Adjusting the speed of footage
Speeding up or slowing down your footage can add meaning to a clip or help it to time better with music or other cuts.
Doing this in camera is better because it will actually capture the frames that you need, unlike doing it in post production where it will be mimicking the look of cutting or adding frames
For Premiere: You can speed your clip by right-clicking on your clip in the sequence and selecting Show Clip Keyframes > Time Re-mapping > Speed. The line on the clip will now represent the timing, and if you create markers (Command-click on Mac or Control-click on PC), you can move those markers to increase or decrease the duration between them.
The importance of good audio
Good quality audio can compensate for low quality video
Premiere Tips
- Whatever footage you drag and drop first into your timeline, it will set the sequence to match to the resolution and framerate of your footage.
- Ripple delete is amazing, but it has some common problems to look out for, tips for not having audio and video fall out of sync when using ripple delete
- Make sure that the video and audio for your footage are linked. If the video and audio are not linked, then when used on video, the ripple edit tool and the ripple delete function will not move the audio.
- If you didn’t know about the razor tool, you do now. When using the razor tool on a video clip that’s linked to an audio clip, it will cut both the video and audio. If they’re not linked, it’ll only cut the clip that you click on.
- Using keyframes to add effects to still images, different recommended styles based on imagery
- Easing/using the graph editor is essential in order to have smooth transitions and movements
General video tips
- Don’t rotate things by hand, use the effects control panel to specify a degree of rotation.
- Select fitting music that suits the pace and mood of the video.
- You can find music that is usable without needing to pay licensing fees at a couple of the links in the description.
- Beat-matching – make your video cuts line up with audio beats if you can. Helps with pacing. (Show quick examples of good and bad pacing)
- Make sure that your audio sounds good. Audio production is half of the experience of watching a video. Because of this, good audio can make or break a high-quality video.
- See my video on audio production
If you haven’t seen that video: you can use the hard limiter in Premiere if you’re short on time and need to normalize your audio volume!
- Use text and graphics when necessary, and take your time to use good typography/ typographic structure in the video so that your message is clear.
- Text and graphics supplement vocals and provide context and detail to solidify talking points
- General design rules apply to videos too! Hierarchy, color theory, line/shape, consistency, contrast, repetition, and so on… Think about what you’ve learned about good design practices and theories, and apply them to videos.
- Make sure that your typography and design elements are consistent across your videos. One video should look similar to another video with its design elements.
- Aligning multi-source audio and two camera shots
- Loud clap that’s visible on all cameras and audible by all microphones all at once. Sound is physical so the clap will look similar in all waveforms
- best practices for fine control over moving audio
- Make sure that you don’t include personally-identifying information in your videos like addresses or license plates etc.
- You can blur out license plates and things really easily with After Effects (will put https://www.youtube.com/watch?v=C45yzo3QPhQ
- Youtube now allows you to add promotional links in the form of “cards” at the end of your videos. If you’re uploading to youtube, be sure to leave some extra time at the end of your videos to accommodate for this!
- Credit all of your collaborators, including the music you’ve used in the video. This can be done in the description of the video in most cases, but it doesn’t hurt to put in-video credits either. Just make sure that you use pleasing typography and keep it consistent with the rest of the typography in your video.
Always shoot extra footage to use for b-roll
If you’re editing an interview, or if your subject is telling a story, add b-roll to keep it interesting. Cut back to the person who’s talking when they say something important, but don’t wait too long before cutting away. In interviews, many subjects say “um”& “uh,” a lot, and may ramble. You can cover up all these cuts while keeping the story moving. It can also be helpful to have other audio besides the interview and use those audio clips to transition, or introduce the audience to another setting.
Stabilize your footage
If possible, use a tripod or a handheld stabilizer for all shots. This will add a level of professional detail to your work. Shaky footage is very hard to watch and will often distract the viewer. If you have footage already, but it is shakey, there are features in Premier and AfterEffects that will help you to stabilize your footage. Warp Stabilizer in Adobe Premiere/After Effects.
COLOR
Color is a huge part of visual storytelling. One of the best examples I have seen recently is Lady Dynamite on Netflix. It is telling the story of the main character at three different points in her life. Each time period has its only specific color palette, and the footage is color graded to help build that world. You instantly know which time period you are in based on the color world. They also play with pushing footage really far, like a van appearing as purple because of the heavy blue saturation.
color correction – In After Effects | In Premiere
The color-correction process is a combination of technical adjustments and creativity. Color correction is the process by which you fix footage that is improperly exposed or balanced, while color grading – enhancing the look of your footage to achieve a certain style. This process is usually done after you’ve color corrected.
If your footage is too green, add a slight bit of pink when you are color correcting to knock it out.
Do two passes through your video,
- first pass for just technical edits & making everything consistent (white balance, contrast)
- second pass for artistic touches (making things pinker, exaggerating color)
SOUND
Video that is a mix of found footage, photographs and voice overs –
The work of Ken Burns is pretty important stylistically because of the way he combines archival footage and photographs in documentary films. Still images can kill a project very quickly, and for that reason many editors try to avoid them. Don’t include too many still images in a row. For any projects where still imagery and video need to be paired alongside each other, I suggest watching work by Ken Burns and using that as inspiration. His style is very easy to follow & sophisticated. He keeps it interesting, quick.
Focus on the big stuff first.
Audio will most likely be the primary delivery mechanism for your story’s narrative because of how immersive it is. Think of how to layer sound, this can be through sound bites, a voice-over track or some combination of the two. Without sound, most multimedia and video stories are difficult to understand.
(This is why it’s important to add subtitles to any video content. Closed captioning can help both vision- and hearing-impaired individuals experience stories more fully, making our work more accessible.)
Layer sound to create richer sound.
Layering makes audio more interesting. It’s a way to communicate different kinds of information at the same time, just like a video shot might communicate one thing with a foreground object and another with a background.
It’s most common to layer interview sound bites or voice-overs on top of ambient sound. Ambience offers a natural background layer, providing a sense of location, while the most important audio (in terms of relaying information) resides in the foreground, at a louder level. Natural sounds usually rest in the foreground, but they can also work somewhere in between vocal tracks and ambience.
Combining all the kinds of sounds into one multi-layer presentation can lead to particularly interesting effects. And, by combining changes to volume with layering, we can shift listeners’ attentions by pushing certain sounds from the foreground to background and vice versa.
Examples
https://demos.littleworkshop.fr/track
Resources
Golden rules for using audio | https://www.creativebloq.com/netmag/5-golden-rules-using-audio-web-71412209
Sound vocabulary
interview clips – recordings of a story’s subject(s), typically recorded on location or over the phone. Interview sound bites help bring the characters in our stories to life.
voice-overs – scripted narration that’s recorded, usually in a studio, to push a storyline forward
natural sounds – sound effects that we record on location — discrete, specific elements that command the listener’s attention when they occur.
ambient sounds – background noises that create a sense of place — the sounds that make the character of a city park very different from a dentist’s office or a bank, for example.
music tracks – music added to a piece